BikeFriday/Foldup Bicycle Packing Checklist
For Shipping or Transporting, v06
By Dennis &Terry Struck, DennisStruck@aol.com
75%-95% of the Functions, Herein, Apply to any Bicycle
Bike Friday: International - USA 541-687-0487,
USA - Toll Free 1-800-777-0258
Looking for what items to bring on a Bicycle Travel Tour or a Bicycle Camping Tour?
then go to the Bicycle Touring Checklist
Long Before; Already Have Done, Have, or Carry:
- Pre mark felt storage bags with marker pen for contents (you will forget after a year and it saves packing time).
- Pre mark the water bottle cages as front and rear, if there are two or more water bottle cages and/or if the cages need to be removed from the bike for suitcase packing, then the potential issue is that while the water bottle cages look the same, usually only one water bottle cage can hold the Z Key and it is wise to mount the Z Key cage only on the monotube.
Caution-Addendum: On bikes with multiple water bottle cages, some water Bottle Cages are bent away from a crank and/or from an air pump mount (opposite directions) and remounting a cage meant for one cage position onto a different position can create noise, wear, or pedaling issues. We now mark our cages for their proper placement/position. - Disposable rags: Clean and dry placed in a dry sack or baggie (We buy white rags, washcloth size, by the case at X-Mart).
- Plywood rectangle: Small, about 3 x 7 inches (for the wheel off fork moments).
- Plastic Sheet, scrap or space blanket, for Bike assembly or disassembly (8'x8' ideal, 3'x4' minimum size).
- Plastic zip-close bags, 3"x5" (keep original shipping parts bags - we bought 100 count 3x5 zip bags from Xpedex, $2).
- Handi-wipes (or equivalent): set aside something now to clean your hand afterwards (you will get dirt and grease on fingers, we use 2"x3" in foil type wipes, bought by the box from X-Mart - we can't work in gloves).
- Bicycle tool bag/kit and Z key: Smart to open the tool kit and lay it and the Z key directly under the monotube. Usually tools should be one of the last things packed and one of the first things made available for unfolding (reassembly).
Just Before Bike Break-Down:
- Muddy Bike? A big muddy cleanup may be needed. If needed, consider borrowing a water hose or visiting a car wash or a creek. If nothing else consider using your water, water bottles, and a rag.
- Wet Bike? Always dry the bike when you can. Given enough time spent traveling, everyone is eventually faced with a situation where they have to pack a wet bike. One usually has about 24 hours before rust sets. So make cleaning, drying, and oiling a priority at the destination.
Break-Down Folding:
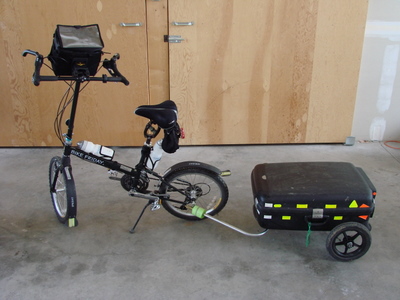
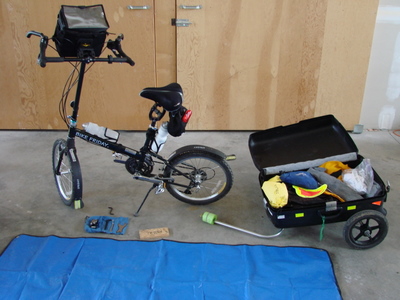
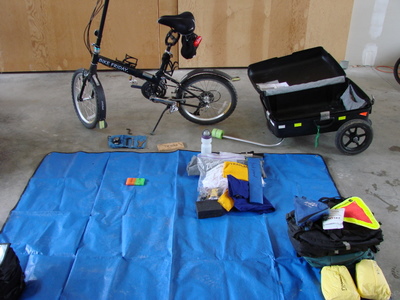
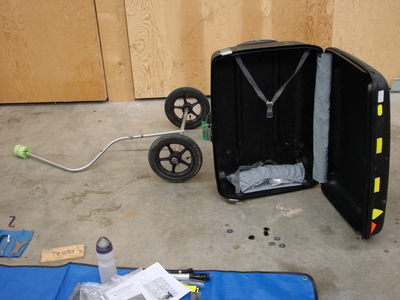
- This can be very stressful sometimes, so be cool, be extra nice to your traveling partner and those around you.
- Remove Grime (Bike and Trailer):
- INITIALLY, Set chain on biggest front ring and smallest rear ring (High-High). Clean/Wipe the Chain and Gear Sprockets as much as possible but finish cleaning after resetting/reversing the gear settings. FINALLY set chain on smallest front ring and largest rear ring (Low-Low, Granny Gear), Wipe big ring well! [Remember to lube after reassembly].
- Wipe down bike & trailer (remove water, dirt, and grease - wipe all exposed greased components clean).
- If not done yet, set chain on smallest front ring and largest rear ring. This minimizes the area that the rear derailer takes up for storage space and it lines up the chain for the fold.
- Separate Trailer from Bike (2 people can do following simultaneously):
- Trailer:
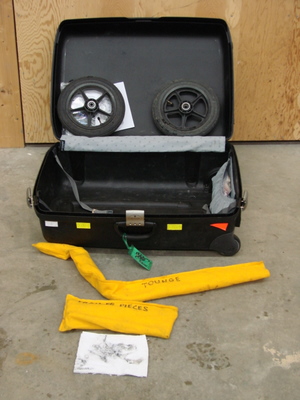
- Empty Travel Contents (plastic sheet for temporary storage or into another bag). Generally we place items that will go back into the suitcase in one pile and items that will go into a different bag get placed in another pile.
- Keep rag(s) handy to further wipe axle, tongue, and parts. - They are always grimy.
- Open Suitcase, set at 90 degrees upright on end, handle up.
- Remove Clevis Pins, Metal Washers, & Rubber O rings (all into plastic zip bag, eventually into Yellow parts bag), Wheels (set in top ledge of case or aside). Wipe off grime.
- Remove all thumb nuts (wing nuts) and remove tongue
and axle assembly.
Clean and Place everything into plastic zip bag. - Place Tongue to its own Yellow bag & axles pieces zipper bag into small parts Yellow bag.
- Set Yellow bags aside.
- Open suitcase, insure storage area clean, straps laid outward, place on ground or rest top against wall. EITHER:
- Secure suitcase pocket, OR
- Remove suitcase side pocket and set aside.
- Bike:
- Remove all accessories: Tire Pump, Bottles, Lights, Handlebar-Bag and possibly the mount(s), and maybe seat mounted tool bag (some pack well on the seat).
- Remove Front Rack, loose pieces into plastic bag, rack & plastic bag into Yellow front rack bag, set aside.
- Remove Rear Rack, loose pieces into plastic bag, plastic bag and rack into Yellow front rack bag, set aside.
- Remove Fenders, leave bolt(s) tight on bike, set aside Fender(s).
- Remove Pedals, place in Blue bag (insure chain set around smallest front ring and largest rear cog).
- Remove Rear Water Bottle Cage, set aside (Remove rear and front cage on smaller bike frames, so seat post folds).
- Remove Seat, Tool Bag, and Seat Post (from each other), if available place seat into bag (or cover), place seat post into yellow seat post bag, set tools aside (Our tractor seats fit into Purple Seat bags if 6 inch center slot is cut)
- Disconnect Front Brake (only loosen noodle).
- Handlebar: Maybe set bar ends parallel to handle bar - make any handlebar componet adjustments first. Separate handle bars and drape counter-clockwise over upper end of monotube (seat post coming down yet). When possible, insure cables are on left side of head tube.
- Remove Kickstand (use Headset Wrench with Plastic Chain-Stay Guard for palm protection). Place bolt into Kickstand and place together into Blue vinyl tube, set aside.
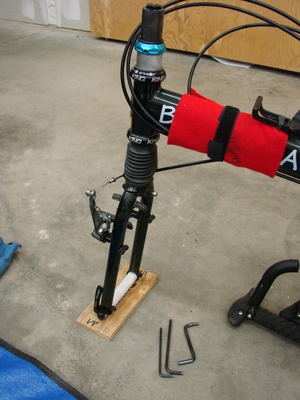
- Remove Front Wheel, insert black plastic axle caps into wheel axel, set wheel aside, set front fork on wood block.
- Place front skewer loosely onto white plastic fork spacer and then snugly mount the spacer onto the front fork dropouts (so you can stand on the spacer to pull the fork off - small end of springs to inside), set fork on wood block.
- Insure, left crank arm is downward.
- The following steps are easier with two people, if only one person then lay the bike on the plastic sheet after the next step:
- Remove Front Fork (from bottom of head tube): Lift rubber boot, remove two hex bolts, nuts into plastic zip bag, pull fork off (sometimes stand on fork spreader), place zip bag and fork into Gray bag, set bag aside along with front brake cable), place Z key on Bottle Cage (if on the bike, else place into tool bag). ALSO, Insure that any rear wheel reflector is located in the bottom-rear spoke quadrant (or else later the crush protector bar may be blocked).
- Remove Steering Riser from Head Tube, place into Red bag (skinny end).
- Verify/Adjust clear plastic hose tube on big crank ring to forward-center of ring (to protect it in the suitcase).
- Put Blue vinyl covers on both Crank Arms. Some Seat Posts also have Blue vinyl covers.
- Put clear plastic hose cover on bottom of steerer tube below headset.
- Put clear plastic hose covers over Chain Stays and Seat Stays (may need remount after bike fold).
- Place Red felt cover over monotube logo using monotube's Velcro strap.
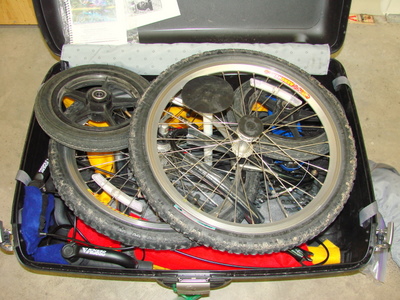
Break-Down Fold & Initial Bike Placement
- Insure suitcase open (either all the way or lid against solid object). Storage area clean, suitcase pocket secure (or set aside), and suitcase straps laid outward.
- Loosen seat post Velcro strap.
- Release Seat Frame Lock/Quick-Release and fold seat post forward while pushing the plastic bottle cage to the left (if on bike).
- Insure crank arms are vertical with left crank arm down (contrary to BF initial folding instructions).
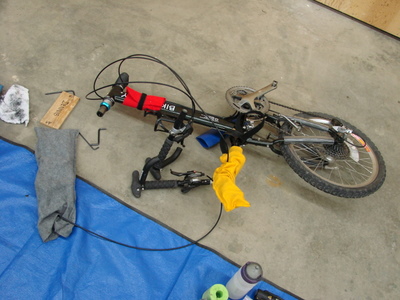
- Fold bike: simultaneously lifting, snap shaking, and rolling the rear tire under the pivot point - rear wheel edge should now be even with monotube top (I often have to sharply hit the rear wheel downward).
- Inspect fold area: Insure Cables, Chain, or anything not binding at the fold area. The chain often comes off the front ring - that's OK as long as the rear wheel can be moved a couple inches either way to realign the crank arms or to make a clear passage hole for the crush protector rod. Assure, fold is complete.
- Recheck: covers on (stays, bottom steer tube stem, & crank arms).
- Recheck left crank arm straight down.
- Remount/Adjust large gear's small plastic guard / cover.
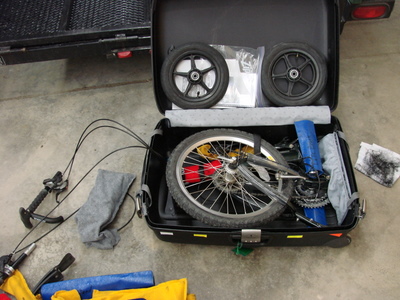
- Place bike into case: Rear tire up, monotube parallel and next to suitcase hinge (back), left side crank arm parallel to right side of suitcase and on up side (pointing toward front of case), square up and snug the bike to the rear but focus on keeping rear tire at lowest position possible. Allow handlebar and cables and the fork bag to drape over the left side wall and where possible don't let the head tube lay on top the cables.
- Check large gear's small plastic guard / cover still mounted at point closest to the right side of suitcase wall.
- Place Black/DarkGray Foam Square pad snugly between Seat Tube (NOT Seat Post) and right side of suitcase. Keep an eye for correct placement, later, as the bike gets jostled around for packing other items.
- Place bottom of crush protector in suitcase bottom and tentatively set the crush proof rod inside.
- Wrap Velcro strap around monotube, wheel, and seat post (securing bike as one unit), no stress on spokes.
Storing Set Asides
In General: Long and large stuff gets stored first and then small stuff gets placed into the gaps - This takes talent, patience, and practice. Don't place anything but bike related items into storage, or else you may make life difficult for your fellow bike travelers.Stress Saving Comments: Once we learned these two pieces of knowledge, packing got much easier and quicker. Don't do this now, just appreciate the changes when you come across them in the checklist:
1. Place the two handle bar pieces below the rear wheel (not above as per the BF Manual/Video).
2. Place both trailer tires in the back corners first, then place the front tire on top (not the angled trailer/front/trailer as per the BF Manual/Video).
BF states that every owner improves with time and practice, packing with their particular configuration.
- Insert Yellow Trailer Tongue bag between wheel and monotube, insure that long tongue-bike fitting end is in front-right corner, straight segment parallel to the front, and other end's S segment to left-rear.
- Insert Yellow Trailer Axle/Small Parts bag under rear wheel, center parallel toward front of suitcase.
- Insert Seat Post Yellow bag between under rear tire and parallel to back of suitcase.
- Reset crush protector rod and bottom.
- Place optional Rear Rack Yellow bag next to and parallel to the left side, keeping the rack rear to the suitcase rear and the bottom of the rack pointing inward.
- Place optional Front Rack Yellow bag flat on top of and to the left of the rear tire, center front-back, skinny end near and parallel to suitcase rear.
- Handlebar Placement: When applicable, put felt covers over brakes and clear plastic tubes over inner handlebar end, and secure with rubber band. The following is performed while also managing the Gray Fork Bag, specifically preventing brake cable binding/kinking:
- Rapid: Place handlebars in L to near left side and left front, under the rear wheel
- STI: place handlebars in X to front-left quadrant, under the rear wheel
- Place Gray Fork Bag under Rear Wheel on top of or adjacent to Trailer Parts bag (insure cables not kinked, they will travel well).
- Red Steering Riser Stem Bag: IF all accessory mounts are removed from the tub, the tube can be stored in the back, parallel to the hinge, <OR> it can be stored in the front, parallel to the handle. IF the handlebar bag mount is still on the tube then the Steering tube may have to be carried in another travel bag/suit case.
- Place trailer wheels to rear-left and rear-right corners.
- Place Front Wheel on top-right of the suitcase. The axle tends to rest best between the chain stay and the seat stay, then wrap both fenders around.
- Place seat in right-front corner with saddle-rear near/against right side of suitcase.
Caution: Don't allow the bike to raise during loose item storage.
- Place Kickstand Blue vinyl bag, EITHER:
- Top-right next to and parallel to front OR
- Bottom-left and next to and parallel to rear.
- Place Pedal Blue bag below right trailer tire near the rear.
- Bag up tools (if they're still out) and place into suitcase. Place near pedals. Never place on/near spokes or painted bike area.
- Install crush protector through wheel spokes, position to center of suitcase as much as practical and not binding anything, Nothing can be placed above the crush protector cap level.
- Place empty bottles (we carry about 6 bottles each, usually only 2 to 4 can be fit into the bike storage case).
- Place any other bike items as will fit.
- Place suitcase straps over the contents and buckle/snap together.
- Fold up plastic work area. Place on top left side on top of strap.
- Optional: Place Black Bike Cary Case/Bag on top left side on top of strap.
- Clean yourself and partner, inspect each other for hidden grease, use handi-wipes and clean rags, dump dirty rags/wipes, store remaining clean rags.
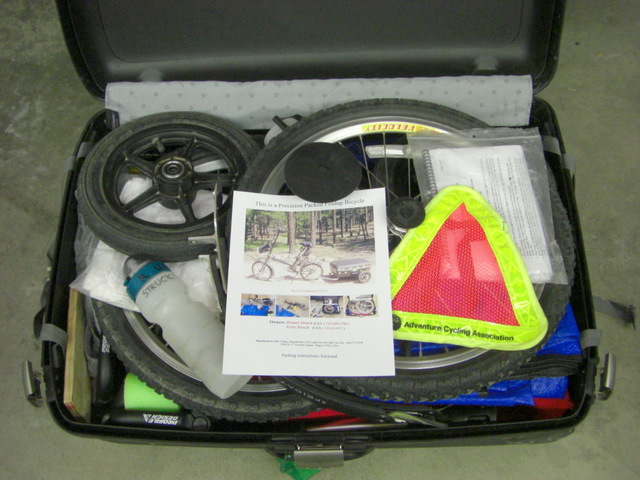
- Place these assembly/disassembly instructions inside Handbook and place inside plastic baggie. Insure cover is front faceing and visible.
- Place a one page Itinerary, Passport Photo Copy, and Destination information inside plastic baggie to backside of BF Handbook in plastic baggie, facing outward on back side of plastic bag. Place entire contents center on top of bike but not on the crush protector, BF Book up. The Itinerary is so that the bicycle can find the owner in case of separation (nightly location and telephone). It Happens!
- Place the Bicycle Owner-Shipper Document, facing up, to the other side of the crush proof protector. (Contact with cell phone number, maybe flight number, and Bike Picture).
- Close suitcase. Remember that you can't lock the suitcase at the airport.
- Thank your partner! Shake hands, hug, or kiss.
Assembly Highlights Only / Extra Attention Areas
Trailer and Trailer Tire Assembly:(If two people, generally, one on bicycle assembly, one on trailer and packing)
- Trailer -
- Grease the trailer rod fittings or they will corrode over time, Grease wheel contact point.
- Main 3 part Axle assembly first, then 2 washers and wing nuts, then front tongue, then final washer & wing nut.
- Axle mount order: Wheel (valve stem outward as well as recessed bearing end inward), then Rubber O-Ring, then Washer, then Clevis Pin (all the way in).
- Bicycle -
-
During Unfold:
- Assure cables are under crank housing (not on housing side)
- Chain not kinked (OK to not be on sprocket/ring)
- Before mounting Fork or Wheel, arrange brake and shift cables (untangle and on proper side of head tube)
- Bottom of head steer tube even with bottom of fork yoke, use/place wood block under fork dropouts, remember dust cover (yoke width aligned more or less with dust cover width).
- Fork dropouts sit on narrow hub shoulder, Skewer springs on outside of drop (skewer springs taper smaller inward, fat edge outward, one spring per side).
- Make sure that the wheel hub shoulder fits squarely into the drop outs. Ninety percent of brake and tire trueness are determined, good or bad, in this one action.
Front Fork Assembly:
Front Wheel Assembly:
-
Fender and Rack Assembly:
- Put rear bottle cage on before rear fender.
- Put Fenders on before mounting Racks.
- Front Rack: Longer spacer on top hole, Shorter spacer on bottom hole.
- Double check, seat mast's quick release locked.
- Connect front brake noodle, and connect rear brake noodle.
- Tool Kit to Saddle, Pump and Lights, Cage and Bottles.
- Re-inspect how the cables fit under the crank mount.
- Lube chain, flat safety test drive, check brakes, shifting, and steering.
Bike Assembly:
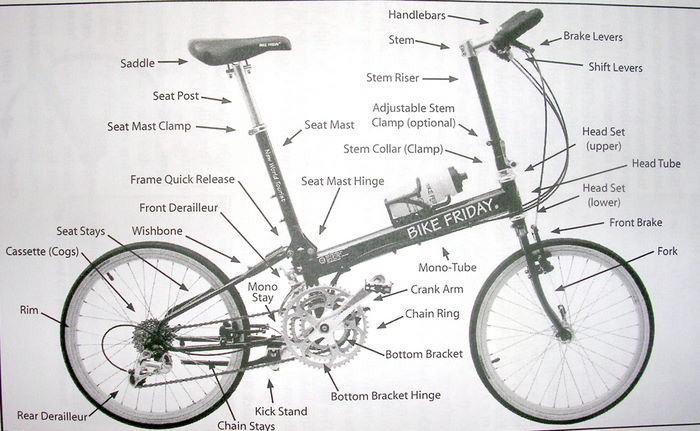
Picture from Bike Friday Assembly Manual.
| Close | Bicycle Touring Checklist | Bookmark | Top | Feedback | Print |