- Hover the Mouse over Text, Links, and Pictures for more Details -
by Dennis & Terry Struck
Bicycle Packing, Shipping, and Transporting, v07
Table of Contents
Bicycle Issues
(Costs,
Risks and Mitagtion,
Metrics,
Containers,
Packing Tools,
Packing Materials,
Air and Freight Carriers, and
List of Checklists for BICYCLE PACKING, STEP by STEP for Shipping, by Bike Type)
Commercial Airline Issues
Security Issues
(Shipping-Ownership Picture Document
for the Wise Cyclist)
Bicycle Packing, Shipping and Transporting
 This Bicycle Packing Checklist (web page) addresses how to break down a bicycle and transport or ship the bicycle in a packed box or case to another destination (foreign or domestic). This checklist addresses shipping issues and solutions. Other linked pages discuss what to bring on a tour, tour planning, travel issues, cultural issues, and bicycle touring experience. In the Big Picture, the issue of whether to ship by freight or carry as airline luggage flip-flops in cycles, sometimes one solution works for a period of time and then some world-wide condition changes and the result indicates a new bicycle shipping paradigm (for a while). The following information examines issues about packing, shipping, and transporting bicycles (no matter the carrier solution).
- Transport Costs and Issues as Airplane Luggage:
Until 2007, for NO additional cost, everyone was allowed two bags at up to 50 pounds for domestic flights, as well as one or two carry-on bags (depending on the TSA Threat Level). Meanwhile, International flights had the same minimum standard (2 bags under 50 pounds) but some carriers, typically Non US Carriers, allowed up to 75 pounds per bag. Starting in 2007, many USA carriers, most notably United Air Lines, began charging for additional bags, period. Typically $15 for the first bag and $25 for the second bag and $125 for any bag over 50 pounds. This is particularly important to flight passengers that carry BikeFriday type foldup bikes in a legitimate flight type suitcase or they carry a break-down bikes in similar type suite cases (often one case for wheels and another case for the main frame). Some air carriers are charging more and a few carriers, like Southwest Airlines, are trying to maintain traditional passenger services (hint hint). Fifty pounds or 25 Kilos (51 pounds) is an important break point calculation value - after 50 pounds is exceeded, cost goes up dramatically for any shipper/carrier. It is noteworthy, that even when one pays for airplane luggage, the cost is usually not over the cost of freight shipping (but Airplane verses Freight/Package Shipping does go in cycles and occasionally Freight/Package Shipping is less expensive). The advantages of freight shipping is shipping directly to a specific address (B&B, Hotel, friend, business, ...) and avoiding long meticulous inspection lines at airport security while the disadvantage is cost. Added 2010: US Airlines charging $100 for a 51 pound suitcase. - Transport Costs and Issues as Package Shipping:*
(Prices for 2010, doubled 2009)
A packed bicycle, meeting typical lower weight conditions, can be shipped via FedEx** to a doorstep/hotel/B&B for about 100 USD (Domestic USA), and about 200 USD (International) for a box packed bike of typical road or mountain bike size. Large framed bikes will cost more. Note that shipping boxes that are wider or longer or heavier than average will be charged double and it will be quadruple if the shipper is not a previously registered user at the shipping company (for instance, FedX - this from my friend Ray F, an international recumbent traveler). By the way, it is free to be a registered member of most shipping companies, it can be done online. Also, some large food warehouse clubs have discounts at some shippers, check it out (SAMS 20% at FedX, SAMs membership is $35/year). Other business member discounts exist. For many, just avoiding airport/airline hassles for baggage handling and transportation hassles fully justifies shipping via a commercial package carrier. Also, in the case of oversized bike shipping containers, this may be the only option. Other sunk costs for boxes or cases are being ignored here and special airline club benefits are being ignored.
*Prices do vary, almost daily, and it is very difficult to obtain tables with weight break points; weight break points also change semi frequently. We consumers, typically have to go to visit each web site or call each business, one at a time, and provide size, weight, and destination information in order to get a shipping charge cost. This process is burdensome.
**A 20 web page informal survey of a sampling of multiple BLOG comments by cyclists, generally indicates that about 19 of 20 cyclists like and prefer FedX for timeliness, dependability, and problem solution management; Whereas maybe 1 of 20 prefer UPS or DHL (European based). Additionally, there actually is a notably small group of bikers that have had many unresolved issues with UPS and significantly fewer people have had traumatic issues with FedX. No shipper has a perfect record. See Damage Prevention Bullet. - TWO BIG ISSUES: Two big mitigating issues have always been:
1) Question: What is one to do with the shipping box?
Answers: Keep the shipping box and find a place to store it, carry it, or get rid of it, and
2) Question: Will one return from a different departure port than the arrival port?
Answers affect shipping-box storage solutions and costs, and the cost of the return ticket is affected
(it is usually more expensive to return from a different port).
If the answer is often 'Yes' to both issue questions, then consider using the shipping case as a bicycle trailer. - Actual Carrier Costs/Web Site:
Common Shipping/Packing Tools
Common Shipping/Packing Materials
 FedX
FedX
UPS
DHL Note: As of Nov 2008, DHL has terminated USA Services.
However: Still Major European Service
ShipBikes.com
AirCaddy.com
Another Bicycle Shipping Site (Much more information breadth: trains, busses, ferries, ...) - Bicycle Shipping/Packing Checklists Top
- Bicycle: General Packing Checklist (For the Typical Solid-Frame Road, Touring, or Mountain Bike)
- Bicycle: Folding Frame Packing Checklist (For Bike Friday Frame Style Bikes)
- Bicycle: Break-Down Frame Packing Checklist (For Coupled/S&S Style Bikes, including Tandems)
- Bicycle Shipping Risks and Mitigation - A collection of selected statements from herein:
- This may be after the fact but where possible:
- For those who travel and transport bikes, over time, bike frame size and breakdown capability becomes a purchase decision factor.
- Buy/Secure bicycles that are designed for easy component disassembly-reassembly, packing, and shipping.
- Buy/Secure bicycles that are lightweight (that is, not heavy weight clunkers). Weight Matters!
- Be very careful about having 'top of the line', 'latest-greatest', newest frames or components as some of these (more than any other classification of lost items) do not seem to reach their destination.
- It seems that about 50% of shipments loose at least one bolt. Granted that in some cases, maybe the part is at the home garage floor, but that doesn't stop the need for the item at a foreign destination. Be Prepared and pack or carry a small quantity of spare nuts and bolts. See Spare Parts and/or Specialty Parts.
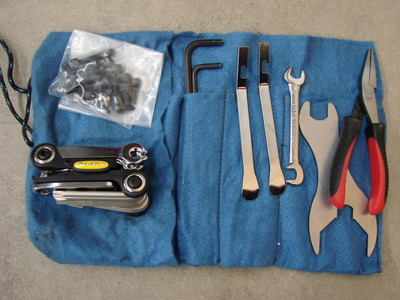 Have assembly tools. Our 21 piece multi tool has served us well, along with some bike
specific tools. See Tools for Touring, Tools for Packing/Shipping and/or
Materials for packing/Shipping.- Fastener Management: Any threadlock, oil, or grease sold in a bicycle shop will suffice.
- Carry and use* a Light or Medium Duty Threadlock (small tube/bottle, about .5 oz, thumb size, usually purple or blue fluid colors) - See About Threadlock.
- Use bicycle Oil (usually in 2-3 oz bottle, 2-3 finger size) on small/fine thread bolts.
- Use bicycle Grease (2 oz tube, two finger size) on bigger/course thread bolts.
- Pack the bike in such a manner that an inspector may easily see everything or easily get to everything. See Bicycle Packing Method Considerations and/or a General Bicycle Packing Checklist.
- Save and carry all shipping documentation, especially Tracking Information/Numbers.
- Much risk is reduced by one or two practice packing's, especially when a Bicycle Checklist, Bike Tour Gear List, Bike Tour Gear List, Bike Checklist, Bike Packing Checklist, is used or generated.
- The process of shipping and packing is very stressful, take note to appreciate to your partner (if you are so lucky).
- Risk is reduced, even for experienced travelers, by having a free day at the destination, that is, Avoid a scenario where one is supposed to arrive at a large city and then bus or train to a more remote destination - Do NOT schedule anything for your destination arrival day. The extra day is a nice buffer for when in-flight travel goes wrong for you or your luggage. If everything goes OK, then one gets to be a tourist for a day with no agenda - fun!
- Often, for the purpose of attaining a weight break point for shipping, some items may be carried by the passenger in their travel luggage rather than be packed in the bicycle shipping box or shipping case.
- Also, it is usually easier and smarter to pack the less heavy but bigger bulkier items in a bike case/box than in with the travel luggage.
- Removing cables will always increase assembly and disassembly time (sometimes required to turn the handle bar 90° or to remount to/from packing, often taped to the up-tube or the bicycle's equivalent to an up-tube).
- Brake issues are further compounded for disk cable brakes and even more so for disk hydraulic brake systems.
- Disk brake systems add some disassembly-reassembly time for rotor mounting and hydraulic brakes have the potential to add even more time if fluid bleeding is required (which means that one may have to carry a bleed kit and fluid).
- I would avoid hydraulic brakes and associated fluid. I keep expecting a no fly notice from commercial airlines against Hydraulic Fluid, but it has not happened yet (as of 2009).
- The safest way to handle brake rotors is to remove them from the wheels for shipping. It turns out to be an easy thing to do and reduces much shipping damage risk. Most of them require a T-25 Torx Driver and appropriate torque, but in the field I have yet to carry a torque wrench. Some rotors require other mounting tools (know your bike).
Bicycle Assembly/Disassembly Time and Metrics: Top
Bicycle Assembly/Disassembly Time and Metrics: It takes one experienced person about 30 to 60 minutes to assemble a Road Bike with basic components (water cages, bottles, water fill, tire pump, tire pressure top off, and tool bag mount), test it, and have the bicycle travel ready. The time may be tripled for the first two shipping experiences - That's OK, just allow more time and remember to be nice to your partner, this can be very stressful when schedule timing is a factor.
It takes three to four hours for an experienced person to assemble a "Hogged Out" Tour Bike with a handlebar bag, light, computer, fenders, racks, panniers, and/or trailer. It can be done by two experienced people in an hour and a half for one bike, or three hours for two bikes, to be road/tour ready to include full pannier and trailer transfer packing.
So, a point of consideration is, if the cyclist is going to be at the destination for one or two days, a bicyclist should consider renting a bike for a day or two, rather than spending four or five hours lugging a bike to and from an airport, going through security, paying extra for a taxi or dealing with bus or train hassles, for one or two days of biking bliss.- Generally, a clean road bike transport may become time-effort justified (or emotionally worthy) with two or more days at a destination.
- Likewise, a touring bike and associated setup may become time-effort justified (or emotionally worthy) with three or more days at a destination.
- Shipping Container Types and Issues:
Top
- Bike shipping containers are either a Box or a Case. "Boxes," are usually plastic or cardboard, tend to be generalized for bicycles whose frame itself does not breakdown into smaller pieces. "Cases," (or Suit Cases) are usually plastic or metal, tend to be used for bicycles whose frame itself breaks down into pieces or folds for a packing purpose. Cases open, close, and can be locked or have a lock attached. In post 9/11 security systems for airplane luggage or shipping, the case cannot be locked and it will be opened for inspection. Most TSA type inspectors will allow a reusable zip tie for lock security (just to prevent a case from opening on its own). Cardboard boxes will also be inspected but inspectors are not going to invest extra time to insure your box's shipping integrity. Often, with boxes, loose parts arrive in a separate TSA/Security type clear plastic bag or the loose parts do not arrive at all. Both situations have happened with us. Cases cannot be made smaller, but cardboard boxes can be trimmed to obtain an overall smaller dimension.
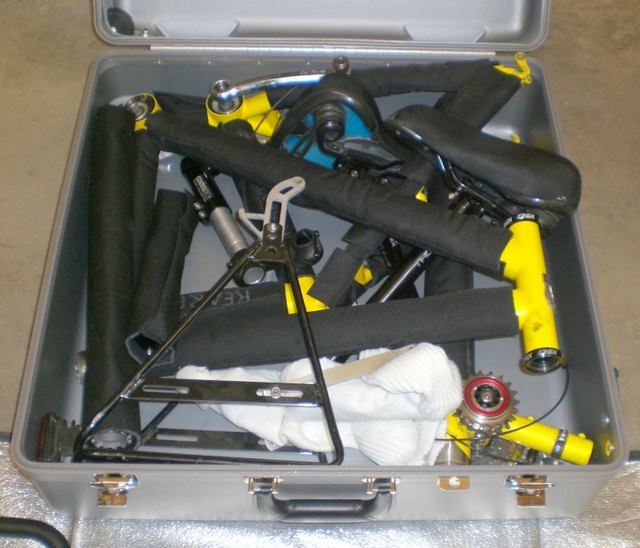 Container Size Issues: The smaller the space, the more economical the transport. Tandems and Recumbents must be able to break-down or there is NO economical shipping solution. Tandems and Recumbents require two boxes or two cases for shipping. Some corrugated bicycle shipping boxes need to be trimmed down to achieve economical shipping rates. It is not worth buying/owning/having a case unless it meets the commercial carrier's maximum acceptable size which is usually 62 linear inches (typically a 26 inch by 26 inch by 10 inch bicycle case measure as 62 linear inches (26 + 26 + 10 = 62 linear inches). Twenty-Six inch by Twenty-Six inch is a common shipping size for bicycles so as to accommodate 26 in wheels. Other suitcase sizes apply and can be used for bicycle shipping too, like for BikeFridays (which excel in the bike shipping realm with their twenty inch wheels - a most undervalued travel method).
- Bike Shipping Size Issue: Top
There is 1) an overall size issue, 2) a break down shipping size issue, and 3) a container size issue. - When shipping, the smaller the overall size, the better. Usually there is NO Choice about the frame's size, but detaching the wheels will always make the frame packing profile smaller. For those who travel and transport bikes, over time, bike frame size and breakdown capability becomes a purchase decision factor. Racing and touring frames are more easily managed than tandem and recumbent frames (but these bike types can be transported if they were pre-designed for shipping).
- The bicycle breakdown capability is always factor. Wheels may or may not have to be removed in order to obtain a desired shipping box size. Sometimes, just one wheel (usually the front wheel) needs to be removed in order to obtain a desired shipping size. Handlebars, nearly always the widest part of a bike, must always be disconnected, detached, and packed sideways in order to obtain a smaller shipping profile. As a side note, panniers on racks are usually wider than the handlebar setup, but panniers are always removed for shipping and most times the rack(s) need(s) to be removed too. Pedals, too, must be removed in order to reduce the bicycle's width dimension. Sometimes quick connect pedal systems help expedite bicycle assembly and disassembly, but sometimes even the pedal quick connect device is too wide (each side adds about one inch in bike width). Meanwhile, back to handlebar issues, sometimes the brake and shifter cables have to be disconnected from the handlebar, sometimes not. Detaching cables will always increase assembly and disassembly time. Brake issues can be further compounded for disk cable brakes and more so for disk hydraulic brake systems. Not often, but sometimes, the rear derailer needs to be removed for shipping - sometimes it needs to be removed just to protect the derailer integrity. Removing the rear derailer always includes chain removal. Chains, in any case should always be wiped clean, but cleaning a chain isn't as big an issue if it does not have to be removed for packing purposes.
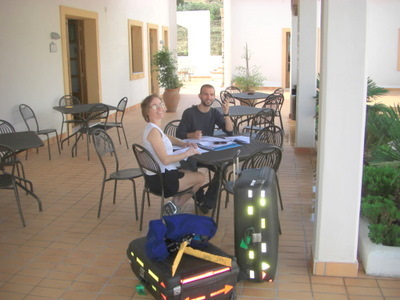 Box Size Matters for Shipping. Hard cases cannot be changed but cardboard shipping boxes can be changed/trimmed/cut-down and they often need to be changed to both fit the bike better as well as to make the overall box size smaller to obtain a required shipping maximum size or to obtain a less expensive shipping box size. Corrugated Cardboard Boxes are generic in their size and fit for bicycles. These boxes can often be trimmed down to take up a smaller shipping size. The container size matters and smaller is cheaper. Bikes shops and airlines sell disposable shipping boxes, currently in the price range of $5 to $25 USD. Sometimes, bike shops can give away empty shipping boxes (of bikes sent to the shop from bike manufacturers). Obtaining a free shipping box is easier setup in advance, easier setup in the Spring Season, and easier setup with a shop that knows you as a regular customer.
Common Tools for Bicycle Packing, Shipping, Disassembly, or Reassembly
Top- Checklist (like any of the following bicycle packing checklists, they really help!)
- Bicycle: General Packing Checklist
(For the Typical Hard-Frame Road, Tour, or Mountain Bike) - Bicycle: BikeFriday Packing Checklist
(For Folding Style Bikes) - Bicycle: daVinci-Tandem Packing Checklist
(For Break-Down Frame Style Bikes) - Plastic Sheet, ~ 8 feet x 8 feet (2.2 x 2.2 yards/meters) or
use a Space Blanket.
This also helps to claim/preserve work space when working in a public area
(parking lot, dock, depot, terminal, ... ) - Phillips Screw Driver (found on most multi tools)
- Flat Screw Driver (usually for accessories, found on most multi tools)
- 3, 4, 5 mm speed hex keys
- Adjustable Wrench, Small (Notes: Typically range up to 19 mm. Bigger multi-tools have a small variety of common metric wrench sizes, typically 8, 9 ,10 mm. 8 mm is the most common/used wrench size, other sizes may be needed. Pedals are typically 15 mm.)
- Pedal Wrench (15 mm is most typical, size can vary, not needed for quick release pedals but on occasion even quick release sockets are too wide for shipping purposes as they add about one inch width on each side.)
- Brake Rotor Hex-Bolt Key (T-25 Torx, one piece, long and short side,
or sometimes on multi tool. Remove rotors from wheels for shipping
and many potential risks/problems are minimized)
HINT: Remove and bubble wrap any rotors; easy to protect, mount, and unmount; easy to damage in shipping - Optional: Crank Ring Removal/Pulling Tool (This is usually not needed for box shipping but it may be needed for case shipping): The tool size/type varies by bike. Often an 8 mm hex key works, usually the multi-tool 8 mm key is too short for good leverage (but it can be used, it takes force) - consider carrying and using a longer hex key (about 6 to 8 inches long, often available at Pawn Shops as one piece) or else one needs a bike or factory specific tool.
- Optional: Plastic (PVC like) narrow pipe, 3/8 to 1/2 inch interior diameter (~ 10-20 mm), to use as fork shipping/storage spacer with skewer mounted through. Pre cut to size, don't over torque with too tight skewer setting.
- Headset Wrench
- Coupler Tool, one notch spanner for S&S Couplers
- Two Pin Spanner for bike with eccentric bracket(s)
- Fastener Management:
- Thread Lock (small bottle/tube, light or medium temporary duty, NOT permanent). About Thread Lock.
- Oil (your favorite bike type brand, NOT {WD-40, 3-in-1, sewing machine}). For fine/small threads
- Grease (small tube, bike type). For bigger/course threads.
- Any tool specifically for your bike, not listed here ___________________
- Any tool used to address a specific ongoing issue with your bike (not listed here)
Common Materials for Bicycle Packing, Shipping, Disassembly, or Reassembly
Top- Plywood Block for fork on ground (3/8" deep, 7"x3"), Block for Bottom Bracket
or placing under rear chain stays to keep rear derailer mount off the ground
(2"x4", 7"long). Sometimes two blocks. - Tie Straps (self stick Velcro [the best], 12 to 15 inches length, .5 to 1.0 inch wide - Available at bigger Cloth Stores in ~3 yard/meter length)
- Black and Grey/Silver Marker Pens (Generally, use black on all colors except black, use grey/silver on black bags/items; handy even after first time). Use as position marker too (in lieu of scribe - scribes are evil, can cause stress cracks under pressure).
- Packing Materials: Combinations of:
- Destination Label (Your creation or shippers)
Return Label for the return shipment
One May or May Not need Return Labels as this may be part of shipper label coding.
Do know contact numbers for destination and return shipping. - Newspaper (Functional, Messy, often available at no further cost, Environmentally Friendly)
- Styrofoam (Please Avoid, Not Environmentally Friendly)
- Closed cell foam cylinder wraps (very useful, almost as good as ballistic nylon wraps but cheaper and often comes on factory shipped bikes - ask your bike shop or go dumpster diving)
- Peanuts (Please Avoid, Not Environmentally Friendly)
- Bubble Wrap
- Packing Tape, Stronger than Masking Tape. Usually Duct Tape is Sufficient. Avoid Box Packing tape on the bike frame or components because the glue often sticks to the bike as the tape is pulled off.
- Protective Storage Bags (felt or polar fleece insulated type, mark with component name if first time; easily made, buy bulk cloth from Cloth Store). BikeFriday sells some Fleece Bag sizes.
- Ballistic Nylon Insulated Velcro Wrap - The Best, not cheap
- Plastic zip lock type Parts Bags (~2x3 inch, ~6x7 inch, ~10x12 inch [~approximate sizes], in lieu of no small bags, use quart and gallon sized zipper type bags).
- Knife (usually on multi tool or part of Swiss type knife) and/or
Box Cutter; neither of which can be on person or carry-on luggage for air travel. - Nitrile type Gloves for hand dirt/grime/oil protection. If one does much touring or works on bikes then it is worth buying Nitrile Gloves in bulk. Know your size. Find through online bike sources. Latex gloves suck.
- Cleaning Rags (for wiping chains/grease, rings/sprockets/cassettes, hands). Very messy, this.
- Handy-Wipes (to clean hands, or similar materials)
 Packing Method and Support Supply Issues
Top
Packing Issues and Solutions:- Generally the biggest components are packed first. See the Bicycle Packing/Shipping Checklists
- No part or parts should be rubbing on one another or rubbing on a shipping container; they can be separated by newspaper, bubble wrap, heavy cloth (like a blanket, fleece liners, or fleece bags). Also, parts can be tied or secured, usually with Zip Ties, Tape (Duct like) or Velcro straps (best). If these supplies are not provided, then find/make/buy them.
- Once the main frame is laid in, Velcro strap the main pieces together such that an inspector or bike packer can lift a component to peek under and not have pieces fall into the space such that the main group pieces can be put back into place without losing packing integrity.
- Avoid metal to metal contact. Anything that can rub will scratch, especially painted surfaces and smooth metal parts.
- Expect that your container will be shaken, opened, and stored in exactly the worst possible manner or position, so prepare accordingly.
- Never have loose parts. Bolts that have not been re-snugged often come loose while in shipment. The issue is that bolts that held a component (a bottle cage for example) are sometimes re-attached too loosely after the cage is removed for shipping, so the bolts work their way loose during shipping and may become permanently lost. It Happens!
- Put loose parts in little plastic bags, label the bag with your marking pen, and store those parts with the same component for which they belong.
- Make and use a checklist. Amend the checklist to your specific needs/requirements.
- Avoid making a long journey for the first travel trip - One will always learn valuable lessons on their first trip. Stay near home, for the first trip, so that one can easily find, fix, and resolve any disassembly, packing, unpacking, or assembly problems.
- The more disassembly and assembly knowledge that one has, the better. No one gets bicycle packing and shipping perfectly correct the first time. Knowledge and experience reduce risk (undesired outcome with a cost).
- Express appreciation to those around you!
- Clear, zip lock bags are easier for the cyclist as well as for TSA/Inspectors to quickly analyze. Pack the plastic parts bags with the matching bike component. Mark the bags to their contents, for example: Front Fender Bolts, Fork Bolts, Rear Rack Bolts, ... . Sometimes zip ties and/or duct tape can be used for securing items or frames. Sometimes a sock can be used to protect a component.
- Always ship the packing checklist with the bike and include an assembled picture (this helps any inspector quickly figure the contents and it helps cyclists at the other end).
- Caution: AVOID putting the bottom of the frame on the ground (floor, deck, ...). The way to get into such a bad situation is to place frame upright against a wall, bench, or furniture in order to work on the bike (assembly or repair) while the bottom of the frame is on the ground (floor, deck, ...). The issue is that the cable retainers/channels will likely be damaged (squished, collapsed, or miss-shaped).
 Other Travel Tricks: Use: bike clubs for advice and discounts, where practical. Join Airline Business Class/Clubs as a customer, where practical - some airlines offer members better/different luggage/shipping rates. Be a registered FedX/other-carrier user/shipper - take advantage of member discounts, where practical - It's free and saves a lot of time in a crunch.
 Bicycle Component Breakdown and Packing Issue:
Top
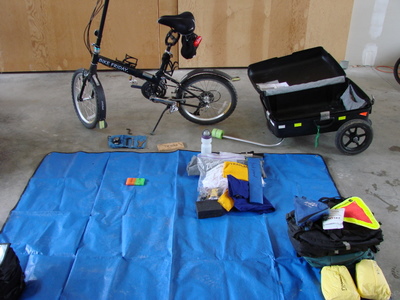
Some bikes are built to breakdown (for travel packing purposes) into many component pieces and to be packed in a smaller packing space (than bikes not built to breakdown). Some bikes fold, some bikes have to be taken apart. Nearly all bikes have to have some component pieces removed, in order to pack well. One of the costs of not having a breakdown bicycle is having to spend more time on bicycle disassembly and assembly or spending more time or money on logistics management. In any case, disassembly and assembly Time increases with accessories and other touring components (like racks and fenders). Also, the physical act of disassembly and assembly of various bicycle components requires an increase of the owner's bicycle component understanding and knowledge. These acts are risky for new cyclists but much risk is reduced by one or two practice packing sessions, especially when a Bicycle Checklist, Bike Tour Gear List, Bike Checklist, Bike Packing Checklist, is used or generated.- Bicycle Maintenance Knowledge: The more that a person knows, the more that trip ending risks are reduced. The three most common touring problems address:
- Tires and Wheels
- Shifting and Drive-Train
- Brakes or Braking issues/problems (all mistakes can be fixed except braking, make sure that your brakes work!)
- Bike Weight Issue: There are usually shipping weight ranges for shipping costs. For commercial airlines, typically 50 pounds (total weight) is major cost change point. For air freight, more or less 50 pounds (total weight, but it varies frequently) is major cost change point. Air freight usually has another break-point around 35 pounds.
There are two weight issues: One issue addresses the raw weight of the bike itself. The other issue is additional accoutrements, such as helmet(s), rack(s), fender(s), bag(s), pump, and tools. There are times when accoutrements, clothing and other things that get carried in saddle bags may or may not fit, weight wise, into the main bike shipping container as the total weight may exceed a cost-weight break point. Often, for the reason of a cost-weight break point, some items may be carried by the passenger in the travel luggage/duffle-bag rather than be packed in the bicycle shipping case. Also, it is usually easier and smarter to pack the less heavy but bigger bulkier items in a bike case/box than in with the travel luggage (like helmets or panniers). - Travel Time and Justification Issue: This may sound silly but there is a Time Travel Cost. A bicyclist should be able to spend more time on a bicycle than the combined time of {air travel time + shuttle/transport time + bike break-down time + bike assembly time + bike packing time}. If a cyclist cannot beat this time by packing their own bike, then a destination rental bike should be considered as well as consideration given to destination bicycle tour packages.
- Travel Distance & Destination Issue: Local vs Domestic vs International Destination. Generally, the further that one travels, the more support one gets. International travelers usually get a better baggage allowance in terms of bags and/or bag weight (as they are expected to carry more luggage). Longer domestic commercial flights can handle bicycle boxes while local puddle jumpers cannot. At best, a local flight can handle suitcase sized luggage that meets the 62 inch (or less) overall measurement. For local shipping, freight carriers like FedX/DHL/UPS (in that order) may be considered but also Trailways (by whatever local name they go by) and Greyhound are worthy of consideration. In many cases, it is better to drive to local bicycle destinations, and in some cases a rental bike may be justified (versus packing a personal bicycle).
- Bike Components and Accoutrement Issues:
Top
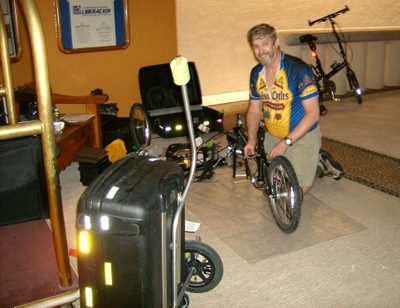 Disk brake systems add some disassembly-reassembly time and hydraulic brakes add even more time (as hydraulic fluid is not legally allowed when shipped, for any carrier). Rotor survival increases when the rotor is removed for shipping - Of course this act increases disassembly-reassembly time. Fenders, racks, panniers, bottle cages, handlebar bags, lights, and travel computers all increase disassembly-reassembly time. Some travel risk is reduced by the use of a simple thread lock (light to medium temporary, usually called Purple or Blue - See Thread Lock for more information).
 - Bicycle Value and Shipping Issues: There is a direct relationship between international popularity and 'top of the line' newness of a bicycle and its arrival record (versus mysterious disappearances of frames or components). Risk can be mitigated with insurance but beware that some insurance types only pay by the pound and not by the actual value. Parcel/Express Carriers tend to have better shipping insurance than commercial airlines. Sometimes, trip insurance will have bike shipping insurance (up to a limit) and sometimes bike shipping can be added to trip insurance. Always be able to prove a bike's value and your ownership - carry photocopies of your ownership documents (on your person).
- Destination Container Management Issues:
- Make sure to ship the bike with enough time to insure that the bike is at your destination when you arrive. There are many stories about bikes arriving three days to a week later that promised or expected. There is nothing like knowing, by phone call, that the bike(s) arrived at the destination before you start you flight across the pond.
- One of the problems with a box or case is keeping it in a safe place and making it available for the return shipment is a cumbersome and time consuming logistics management issue. Box disposal and new box purchasing can be problematic, especially when the arrival and departure points are different. This problem goes away if your case becomes a trailer but not everyone wants a trailer (versus panniers or versus no luggage with which to contend).
- Make sure to specifically tell the destination receiver, often a bike shop (hint hint), to keep the shipping box or get rid of the shipping box. There are many stories of bike shops throwing out one's shipping box when the cyclist had expected the shop to keep it. The problem from the bike shop's perspective is that storage space is a premium; all space is used to store items behind the scenes in a bike shop.
- Some people perform air travel with their panniers as carryon luggage - Robert B
- Getting out of town or using public transportation (like buses, trains, taxies, or ships) becomes problematic or needs to be addressed beforehand. On site shipping logistics issues seem to go away if a luggage portage service is used.
- Shipping Documentation for the Wise Traveler:
Top
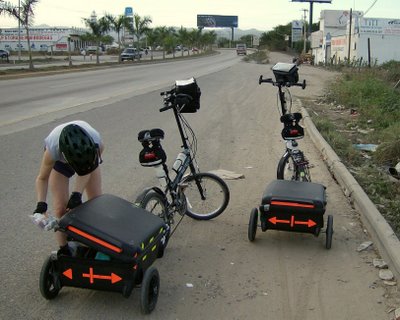 The bicyclist (person) should have: ID and/or a passport, a photocopy of the proof of ownership (copy of sales invoice or such) and a detailed travel itinerary with daily addresses and phone numbers for various places of stay (as well as a home base person, address, and telephone, as well as a flight information schedule).
- The bicycle shipping container should have: A copy of the owners passport, a picture of the assembled bike with home base information; bicycle assembly instructions; an itinerary of the bicyclist(s) so if the bike is discovered at an airport at the opposite end of the world, the airline can figure where the owner will be on what day and know how to get hold of the owner.
- The bicycle should have: A copy of the owner's ID/Passport. Usually this is kept in the tool bag or the handlebar bag.
- Many bicycles get damaged in shipping according to article after article about packing bikes for air travel, almost every damaged bike was poorly packed or loose parts were not well bagged or not bagged at all so the result was lost parts or damaged goods. This web page is all about proper packing technique and carrying a handful of important (strategic) spare parts. For example: Spare Nuts and Bolts (4,5,6,7,8 mm; hex key head bolts, long and some short), several metric nuts (especially in smaller 4, 5, 6 mm sizes; note that metric Washers are smaller than their inch width counterparts), and Spacers (if appropriate).
- If the bike is not assembled and validated for bike damaged at the air port baggage/shipping/cargo area, then a cyclist may not have any legal claim for damage. Once one removes the bike from the airport area (or destination shipping area) then may have no legal claim for damage.
- Pack and Carry Spare Bolts, Nuts, and Washers:
Top
For example: Spare Nuts and Bolts (4,5,6,7,8 mm; hex key head bolts, long and some short), several metric Nuts (especially in smaller 4, 5, 6 mm sizes; note that metric washers are smaller than their inch width counterparts), and Spacers (if appropriate).
Here are some things that have happened to us over many years of domestic and international bicycle travel
(just to drive this point home):One pannier rack bolt was missing, discovered during arrival assembly. An overly long spare bolt was substituted (with many washers).
- The upper bolt, on a front disk brake mount was missing, discovered in mid tour, miles from anywhere. If it were the lower bolt that was missing, we may not have been around to communicate this message. We swapped a shorter bolt from another bike bolt location and then placed a longer spare bolt in that location. NOTE: Had the original brake bolt been mounted with a thread-lock compound, during maintenance back in the home town, this incident probably would not have happened. Shipping did not cause this to happen but poor maintenance judgment contributed.
- One of two fork clamp bolts was missing, discovered during arrival assembly. Traveled 25-30 miles on one bolt until day break; A Gentleman from Stow Scotland had a spare to help us - got to meet a nice gentleman.
- One of two handlebar bag mount bolts, pulls-strips through a plastic mount during arrival assembly. A simple spare washer was the solution.
- We traveled to France to rent bikes for a tour. We brought our own seats (saddles). The French bikes had a strange seat post mount (it was actually Chinese). 24 hr FedX shipment resolved problem - meanwhile, the first day of riding on their skinny hard seat was not pleasant.
- To further plea the importance of a Thread Lock compound, note that it is rather common for touring bicycles to either loose a bolt or two over time or for one to discover a bolt or two coming loose over time - This is especially true for dirt road touring. We have lost numerous bolts and some nuts and spacers while only on three and four day mountain trail tours (and we are NOT rough bike handlers).
- If a bike uses an unusual, different, or difficult to obtain fastening component, then by all means, carry a spare (or two).
- Thread Lock (like Loctite 242 or Permatex Medium Strength Blue). Learn More. Its good insurance, considering that a small bottle/tube may save a day (or days) of tour time, it's worth the investment. Granted, that it is wise to have applied thread lock to key components before a tour, for those who travel and reassemble/unfold bikes at the destination, Thread Lock is very useful.
Checklists, by Step, for Bicycle Disassembly/Assembly
Note: Mavis O sent a humorous Facebook posting to remind some people to add Reading Glasses (for reading checklists, bike packing, and bike assembly).
Destination Airports often have a separate baggage claim area than those of domestic passengers - If you don't see your luggage but all of the locals have their luggage, be looking for a different luggage area. Usually this is a self contained area with a baggage inspector. Informational signs can be sparse in some locations sometimes.
Each carrier has their own shipping and processing idiosyncrasies, talk to someone and/or read the online information keeping in mind that either may have out of date information - record names and dates and keep copies of pertinent online info (this action has saved our vacation more than once, especially keep tracking numbers and website name). I have yet to find a definitive bicycle shipping procedure for any shipper or air carrier that is actually user friendly and helpful to a bicyclist.
Commercial Airline Issues
Top- Commercial Airlines recommend keeping tires at least 15 PSI below the tire's recommended maximum pressure.
- Commercial Airlines will not allow a passenger to carry pressured air or CO2 cartridge(s) on their person or in a carry-on bag. So far, it is still permissible to carry CO2 cartridges in the luggage. Nor will they allow Hydraulic Fluid to be carried on board.
- The bicycle pack cases (and personal suitcases and carry-on/briefcases) should:
- Be well marked/labeled for the traveler' name, international telephone number(s), and home or work address. There is some wisdom in not giving the home address, as some unscrupulous theft rings have used this information to perform home burglary - many frequent travelers use their work address or their travel agent's address (and in some cases, their telephone number).
- Contain a copy of your Photo ID or Passport (blackout any Social Security Numbers or such).
- Have a copy of the Itinerary (that lets a lost luggage handler find you on X date at Y location or at Z telephone number).
- Most Domestic (USA) carriers only allow 50 pounds per bag, 2 bags per person. If a passenger was to have a 40/60 pound split, the issue isn't about total weight per person, the issue is about baggage handlers and work safety with per bag limits (for which a Union is, understandably, involved). Keep Reading!
- Some Commercial Airlines, like British Airways, allow 75 pounds per bag for International Flights while other Commercial Airlines only allow 50 pounds per bag. Some airlines will average or work from a total weight perspective and some airlines won't. Our Bike Fridays, with gear (as much bike touring accouterments as we can stuff in, like fenders, racks, tools, bottles, ...), seem to come in naturally at about 55 pounds per bag - so see next bullet.
 Sometimes we move a couple heavy items from one bag to another bag and pay the overweight fine for only one case (versus two or more cases), sometimes we bite the bullet (and pay two overweight fines, depending on how soon flight departure is given that a long security line still precedes that flight). It used to be that non USA carriers were more strict than US carriers, but those days seem to have disappeared subsequent to 9/11 (and in a couple of cases, some carriers outside of the USA seem much more organized, efficient, and effective in handling shipping and human processing).

"Bicycle Shipping-Ownership Document" for TSA/Security Inspectors
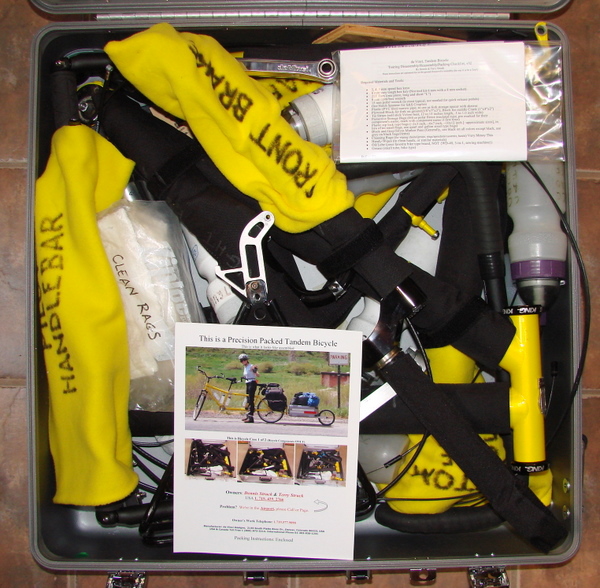
TopInspectors can be helped to quickly understand that they are looking at a "Packed Bicycle" and not a weapon of mass destruction.
"A Picture is worth a Thousand Words"
-
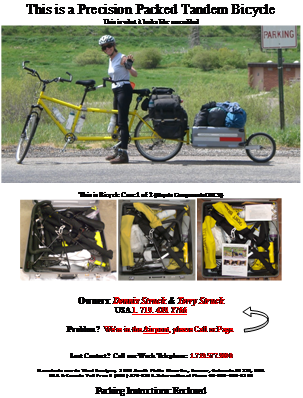
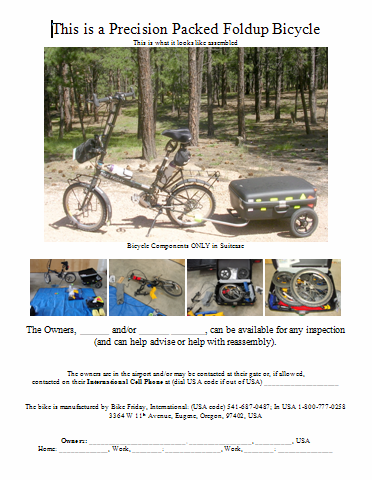 What: Bicycle Shipping/Ownership Document:
Who: For Baggage Security Inspectors, Customs Inspections, Agricultural Inspectors.
Why: This facilitates the Inspector's understanding (at what is being looked).
How: Place this document in the open such that it is always the very first thing seen by the inspector. It is the most important document and should never be covered. Do place this document in a document cover/protector. Make the document plain, simple, and straight forward.
Caveats:
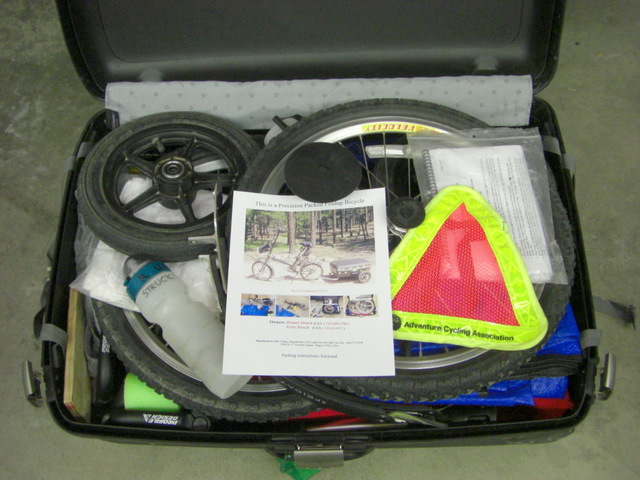
- The idea is to have a picture of the bicycle on top of the bicycle.
- If the Picture Document also has the Owner's Name and Contact Information, the Inspector will be Happy and, potentially, a lot of time can be saved.
- We list our travel cell phone number and make sure that our cell phone is turned ON, until boarding an aircraft.
- It is important to keep this document very simple.
- At its basic, there should be a Picture of the Assembled Bicycle, the Owner's Name, and a Contact Number - More information tends to freak out the inspectors.
- We also have a few smaller snap shots of the bike in different stages of assembly; it seems to help demonstrate the complexity of the bicycle system.
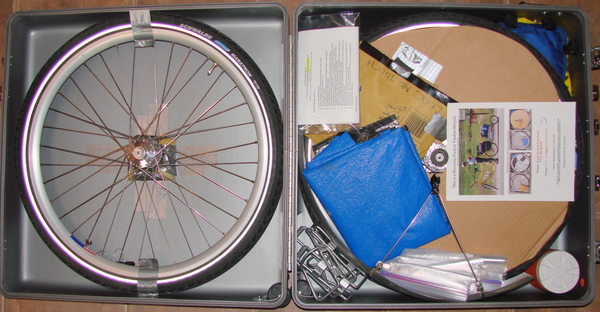
See (All Word .doc Files): Example 1, Example 2A (1 of 2-Frame), Example 2B (2 of 2-Wheels).
See the Inspector's View.
See Table Exhibit at the end of this list.
NOTE: PLEASE create your own document with your own pictures. 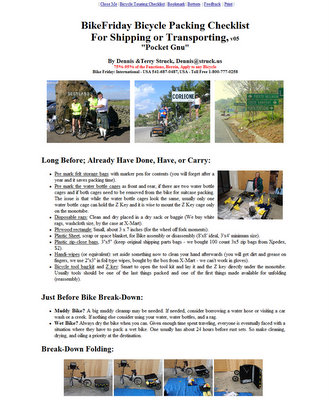 What: Bicycle Packing Checklist:
Who: For Both, Security Inspector or Owner to use, if contents are removed/dumped/inspected.
Why: To assist either the Security Inspector or the Owner in Re-Packing the Case/Box/Container.
How: Place the document so that it will be the next, second, document seen (after the Ownership/shipping document). The packing checklist will nearly always be more than one page, so assemble it inside a clear cover like, either, a large gallon size zip type plastic bag or an actual clear Document Protector. Being waterproof helps. Sometimes the Bicycle Packing Checklist needs to be folded in half; be sure that the main checklist heading will display to the Inspector.
Caveats:
- One of the reasons for using and placing Velcro Straps around major bike components is to keep the bike pieces from falling apart like Pixie Sticks. Thus, an Inspector can actually lift the major bike unit up, look or feel under the unit, and safely return the unit back to the case/box/container.
- We have discovered that we do not need to pack or carry the Bicycle Touring Checklist. The Bicycle Touring Checklist is only needed to assemble what to bring; once it's assembled, the checklist is not needed for actual packing or repacking at the other end. At either end (home or destination), one only needs the Bicycle Packing (Assembly/Disassembly) Checklist.
- Sometimes, the bicycle itself has a User's or Owner's Manual. When the bike does have such a manual (they're usually 10-20 pages) carry it too. Where needed, we usually store the Bicycle packing Checklist and the Bicycle Owner's Manual together. We tend to leave whatever page that looks the most 'Bicycle Technical' exposed as the cover page in the plastic cover.
Select a Bicycle Packing Checklist:
- Bicycle: General Packing Checklist (For the Typical Hard-Frame Road, Touring, or Mountain Bike)
- Bicycle: BikeFriday Packing Checklist (For Folding Frame Style Bikes)
- Bicycle: daVinci-Tandem Packing Checklist (For Break-Down Frame Style Bikes)
Top
- What: Itinerary (One Page Only, Summary):
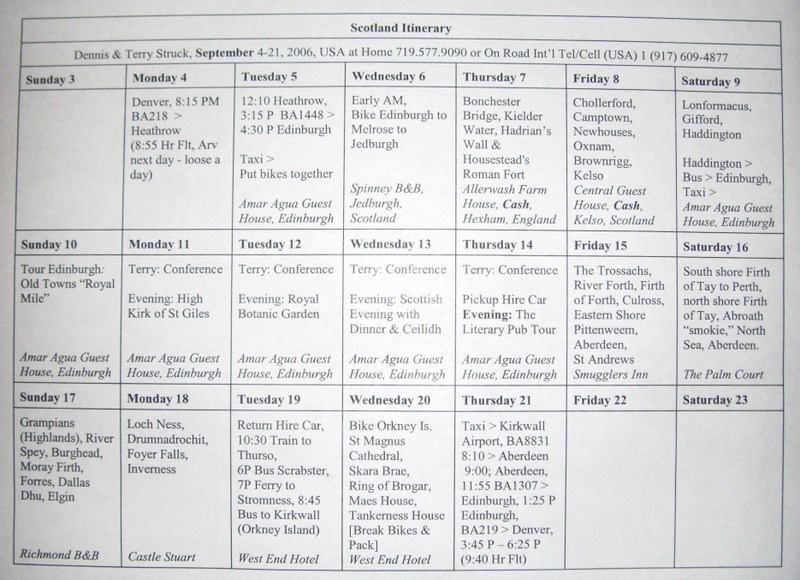 Who: For the Security Inspector to see that the bicycle will be used on a bicycle tour and for a Luggage Manager/Controller of Lost/Misplaced Luggage, to be able to find where the Bicycle Owner is on any particular day (or night).
Why: Mainly to insure that the Bicycle Luggage/Shipment can still be directed or re-direct to its Owner who will be at X Location on X Date.
How: It is placed in the Case/Shipment so that it can be easily found but NOT placed in such a manner as to block the viewing of the Ownership Document or the Packing Checklist.
Primary Display Method: In its own document protector (or in a one gallon sized zip lock type plastic bag).
Secondary Display Method: In the flip side of the Ownership Document.
Caveats:
- Displaying More than one itinerary page is a waste.
- Create this document as a two to four week calendar layout.
- Show the Month, Days of Week, and Date in a block layout style.
- For each Date, show two or three main Route Highlights, Place of Stay, and Lodging Telephone Number.
- Additionally, if it is a transport day (airplane, train, boat, ...) then list the Carrier and Flight/Leg-ID, Location, and Departure and Arrival Time, (or rental car agency; just be helpful).
- Think in terms of "If the shipped case gets lost, can the case be returned expeditiously?" Plus, Inspectors appreciate this style of travel openness (on many levels)!
See an Itinerary: Example 1 (jpg), Example 2 (jpg), Example 3 (Best-doc).
Top  What: Big Sized Packed Bicycle Picture (Optional)
Who: Mainly for Owner Repacking, but potentially for an Inspector (to see where the major pieces belong for a repack).
Why: Because after a while, we forget our best shipping layout.
How: Place the picture in with the Packing Checklist. It does not need to be as visible as the Packing Checklist.
Caveats:
- We learned this unwittingly. We once took pictures of uncovered bike components, in a case, just for a trial packing layout. We learned that these pictures helped us pack quicker and we learned that pictures help some Inspectors rapidly identify the bike pieces.
- We have learned that most inspectors are familiar with bicycles, and love to see bicyclists visit their country (bicyclists seem to be much more appreciated than bus tourists). Place the best picture directly behind the checklist, such that it is the cover-view on the flip side of the Packing Checklist.
- Both the Checklist and the Bike Parts Picture should be placed in a clear document protector (or place the best picture in its own see through plastic document protector).
- If there are additional pictures, place them behind the best picture - No need to overwhelm the inspector.
See a Packed Bicycle Picture: Example 1 (before bundle strapping and small item stuffing),
Example 2 (before adding cardboard partition between wheels).
True Story: We watched a foreign baggage inspector pick up a packed BikeFriday in its suitcase and drop it on a counter top from about six inches, not being mean but being in a hurry. He opened the suitcase and saw the strange contents. He then picked up the Shipping-Ownership Document that we set on top of the suitcase's contents and he looked at the picture. We could see him immediately realize that the contents were the same thing as pictured (a fully assembled road ready bike). He then did some courtesy probing but from a point of respect. When he was done, he closed the suitcase and gently set it down for a baggage handler to pickup.
What the TSA / Security Inspector Sees
Set the Bicycle Picture Document on top of everything in the suitcase, centered as much as possible but off of the anti-crush brace. Position the Bicycle Picture Document as visually dominate as possible. A big bike image/picture helps. Nothing should be allowed to get in the way of displaying the document.

